How to Mass Delete Emails on iPhone (Step-by-Step Guide)

Alexandru Vasile

Inbox overload is a big problem nowadays. Maybe you subscribed to too many newsletters, your email is getting too much spam or you’re running out of storage. Whatever the reason, we’re going to show you how to bulk delete emails on your iPhone or iPad.
For all the iOS users out there, we’ve got you covered. Here are the easiest ways to delete emails and mass delete emails from your iOS device. There are different ways to approach this, so I suggest you scroll down till the end of the article.
How to Mass Delete Emails on iPhone using the Mail App (Step-by-Step Guide)
🟢 Difficulty: Medium / 🟡 Efficiency: Medium / 🔴Low control on what you delete
Deleting all your emails on your iphone and getting to Inbox Zero is easy, but it’s also dangerous‼️ When you simply go for it and delete all your emails, they’re simply gone. You might not know what you bulk delete and you can lose important information.
But, if you’re feeling brave, follow the tutorial. If you’re looking for a more controlled way to clean your inbox and get to inbox zero, keep scrolling.
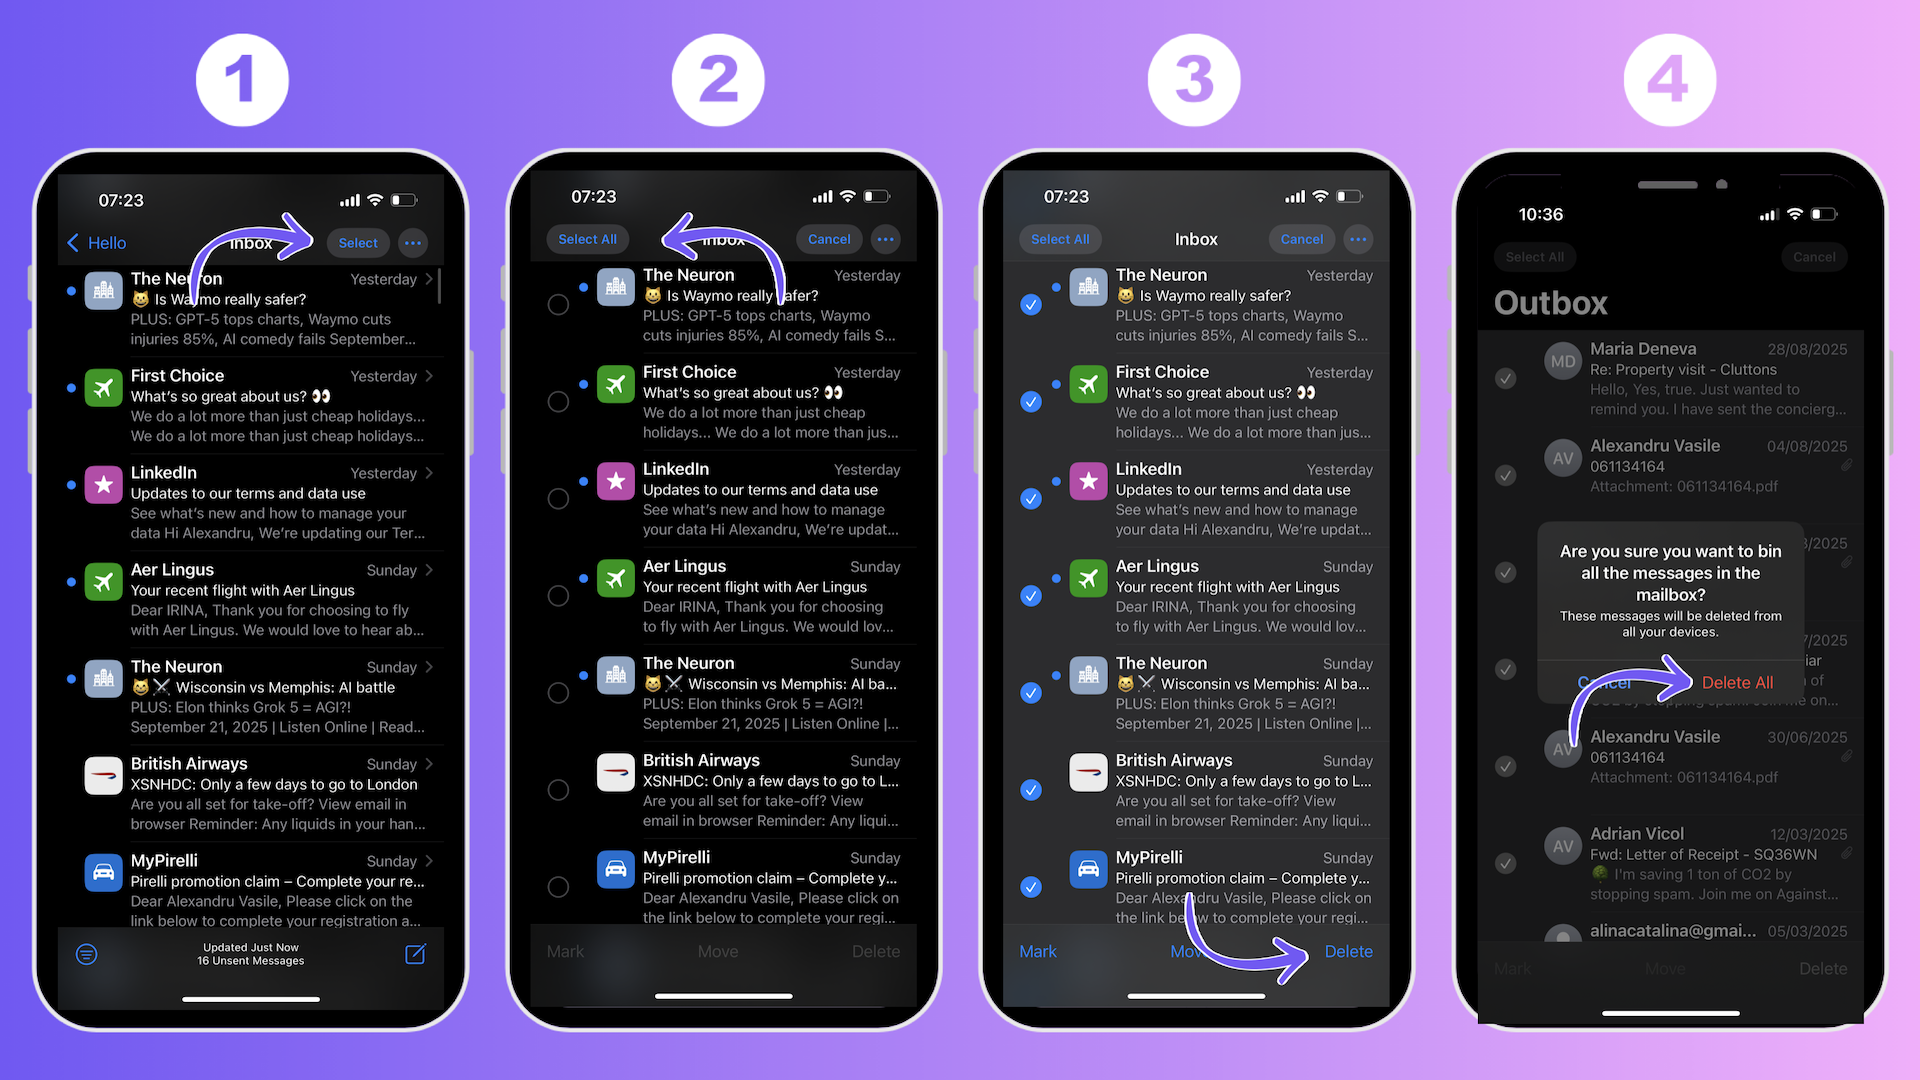
Step by Step Guide to Mass Delete Emails in iOS Mail App
- Open the Mail app and go to the mailbox you want cleaned (e.g., Inbox or Gmail).
- Tap Select in the top-right corner.
- Tap Select All; otherwise, tap individual emails or use the swipe gesture to multi-select.
- Tap the Trash or Delete icon at the bottom-right.
- Confirm by tapping Delete All or Trash All if prompted.
- Empty the Trash mailbox by opening it, tapping Edit, and selecting Delete All.
Tip: For older iOS versions lacking “Select All,” tap Edit in the top right corner and you should find the Select option there.
‼️This approach doesn’t unsubscribe you from all those unwanted emails, so they’ll keep coming and you’ll have that problem again very soon.
How to Bulk Delete Emails via iCloud.com (Web Browser)
🟡 Difficulty: Medium / 🟡 Efficiency: Medium / 🔴Low control on what you delete
You can actually use your computer to delete emails from your iPhone. This gives you a bit more control, but you still have to be really careful so you don’t delete anything important.
Step by Step Guide to Mass Delete iCloud emails in web browser
- Open your web browser and go to iCloud.com
- Sign in with your Apple ID
- Click on the Mail icon, this will open iCloud Mail
- Navigate to the mailbox you’re planning to clean up
- Select multiple emails
- Once you’ve selected multiple emails, click on the Bin icon (trash icon) or the 1. 7. “Delete” button in the toolbar.
- Confirm deletion when the message pops up
If You Want Those Emails Gone for Good, You Also Have to Empty iCloud the Trash Folder.
Just deleting emails simply sends them to the Bin (or trash) folder, so they’ll still take up space. That’s why you have to empty the Bin by following these simple steps:
- Go to the Mailboxes list on iCloud.com
- Click on the Bin folder
- Click on the gear icon (settings) at the top of the Mailboxes list
- Select Empty Bin
- Confirm by clicking Empty Bin
The action that you take on iCloud will also delete the emails on your iPhone.
‼️But this doesn’t unsubscribe you from all those unwanted emails, so they’ll keep coming and you’ll have that problem again very soon.
How to Mass Delete Emails on an iPhone in the Most Effective Way with AgainstData
🟢 Difficulty: Low / 🟢 Efficiency: High / 🟢100% Control over what you delete
If you’re looking for the safest and most effective way to mass delete emails on iPhone, go to AgainstData.com
The AgainstData App is a super effective email management tool that saves you a lot of valuable time and boosts your productivity.
In a matter of seconds, you can go through the list of companies that are sending you emails, unsubscribe and bulk delete all emails associated with those companies you unsubscribed from.
Plus, you can also keep receiving emails from companies, but delete all the old messages that have been associated with them. You clean your inbox fast, in a controllable way.

Step by Step Guide on How to Mass Delete Emails on iPhone with AgainstData
Like we’ve promised,, here’s a step-by-step demonstration on how to get rid of unwanted emails for good with AgainstData:
- Login to AgainstData
- Click on the Personal, Promotions or Notifications tab on the left hand side
- In the Promotions tab, AgainstData identifies the senders behind your emails
- Click Unsubscribe next to the sender you want to stop hearing from
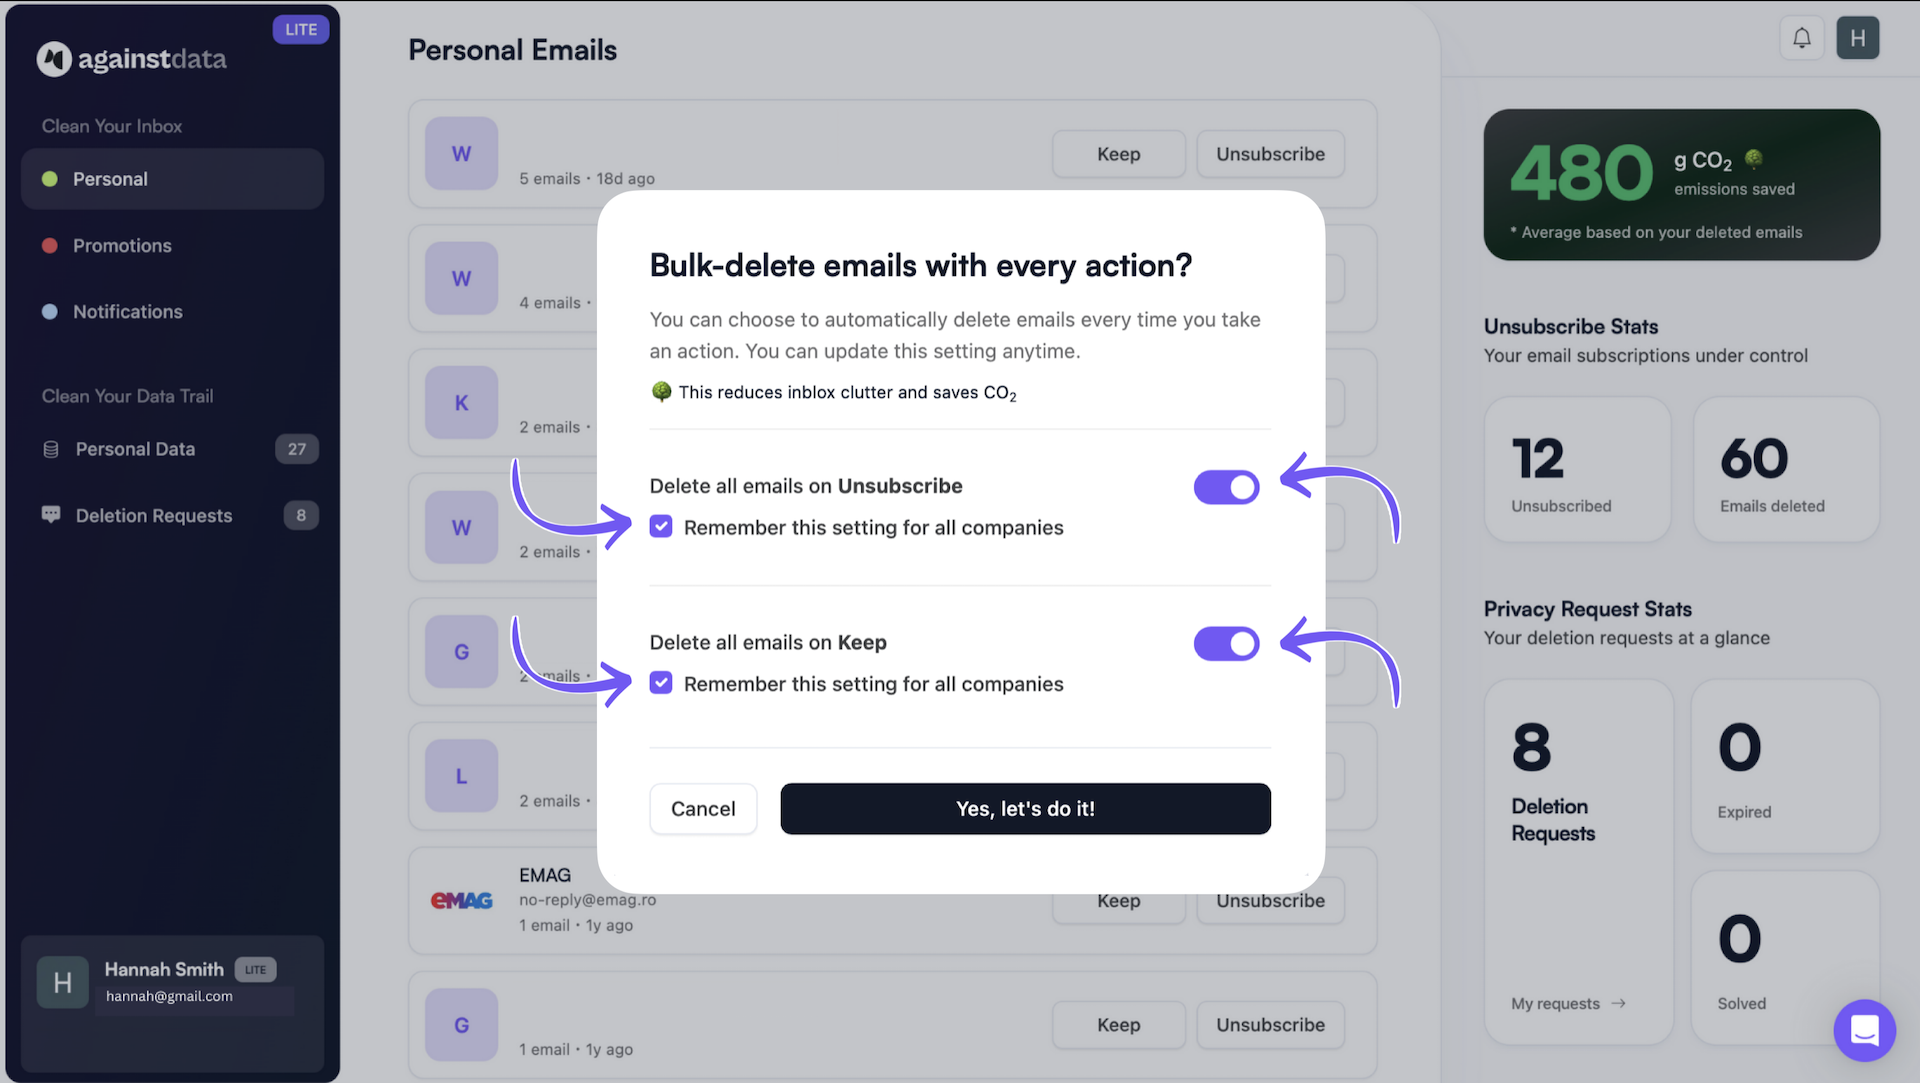
- A new window will open allowing you to delete all unwanted emails from that sender
- Toggle the switches to mass delete all unwanted emails
- Select Remember this setting for all companies
- Click on Yes, unsubscribe me! to unsubscribe from the newsletter
Make sure your clean inbox stays clean
AgainstData is super focused on privacy. It was built to keep your inbox clean and help you remove personal data from the companies that have it. This way, you make sure they’ll never bother you again.
- Log in AgainstData.com
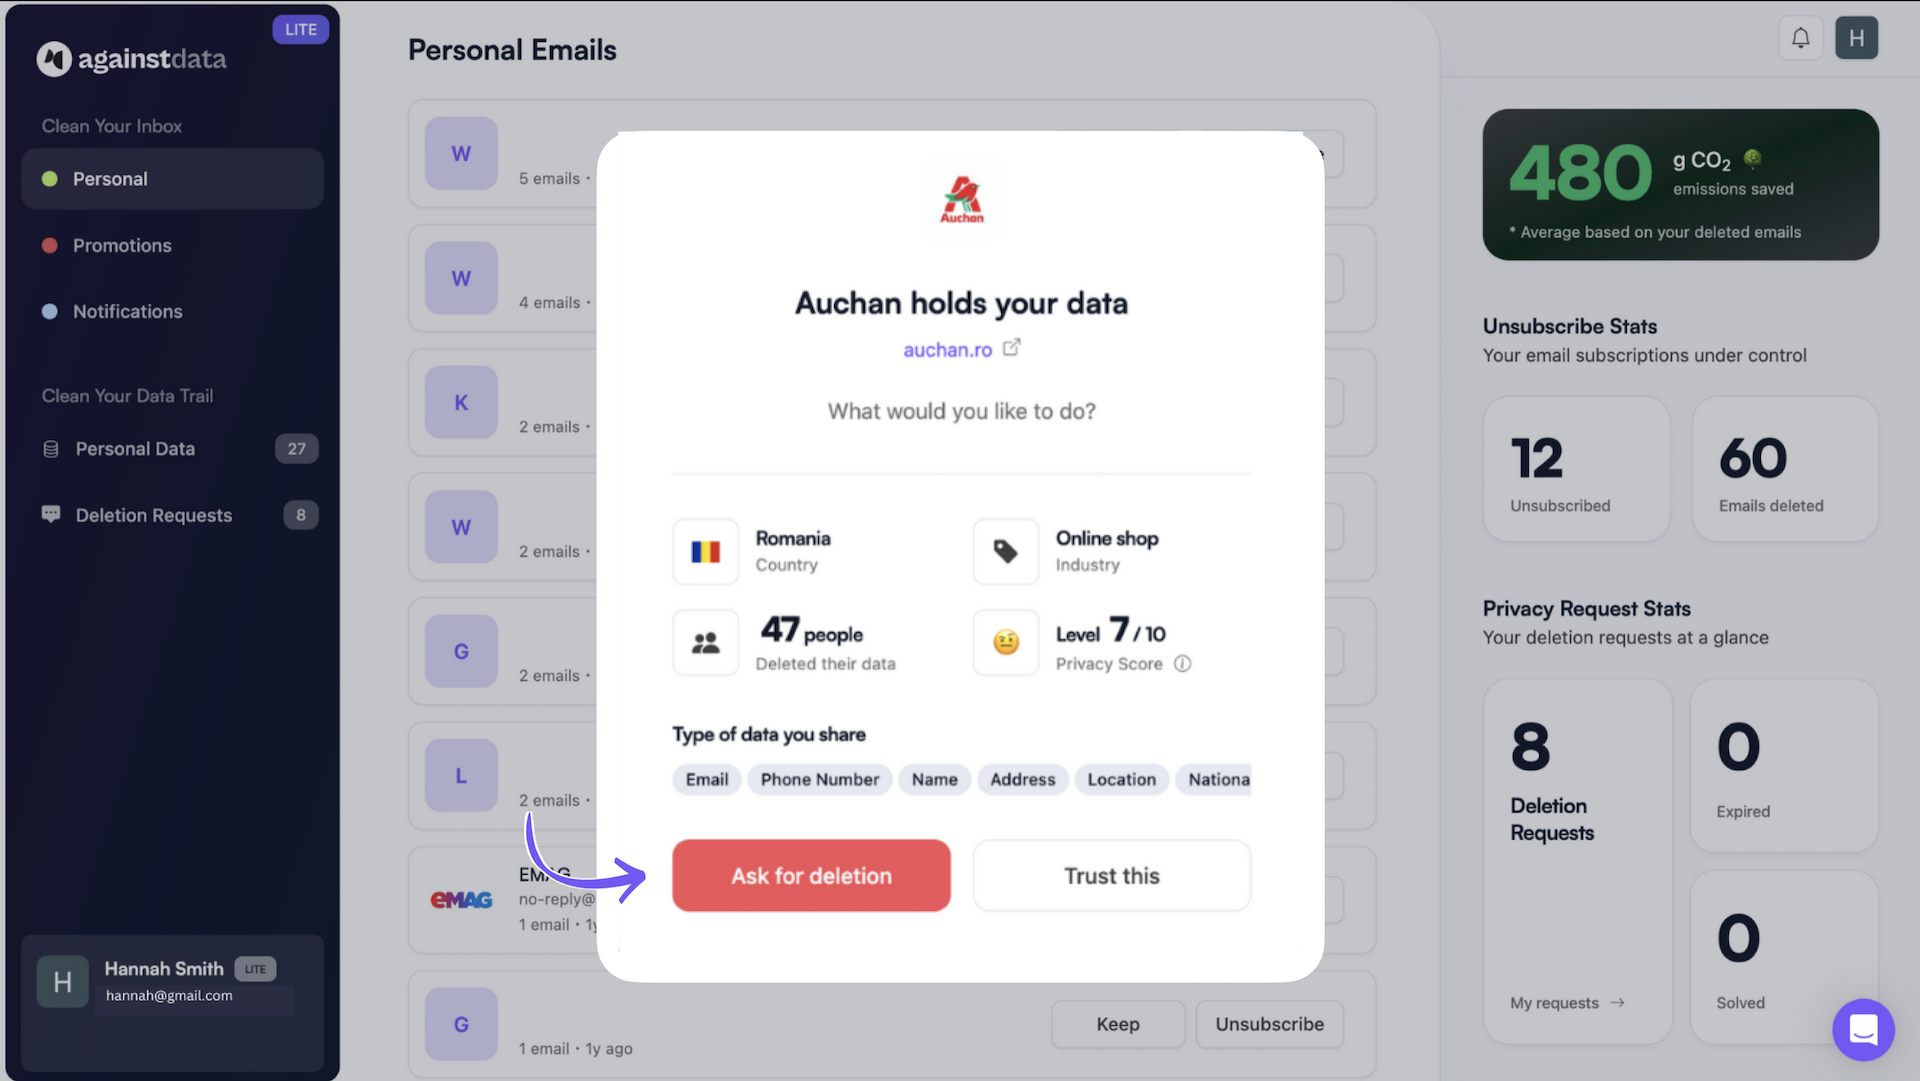
- Navigate to Personal Data
- Select a company you no longer use
- Click Take Action
- Click Ask for Deletion
- Monitor confirmations in the tab called Deletion Requests
Conclusion
There are many ways to mass delete emails and clean your iPhone, but choose wisely. Use AgainstData to delete, unsubscribe and remove personal data, making sure that your actions will last.